Working with Burlap

Of course you know I swoon over Pottery Barn products. While their products are definitely my style, their prices aren't... well until they go on sale. I find that Pottery Barn catalogs are always an inspiration. One constant in their decor is burlap. They use it on everything from pillows to lamp shades to curtains... it's every where.


I recently purchased burlap by the yard from Hobby Lobby to use for a project I'm working on for my sister's bridal shower.  Since I had some left over, I decided to try my hand at a painted burlap pillow. 

I created this pillow using only supplies I already owned:
  • Burlap (previously purchased for a different project)
  • Stencils (previously purchased for a different project)
  • Ribbon (I always have tons of ribbon laying around.)
  • Pillow Insert (I used a decorative pillow that I had from my college days.)
  • Black Paint & Paint Brush
  • Hot Glue Gun & Glue Sticks (Every crafter owns one.)
  • Straight Pins
  • Scissors
  • Tape
  • Button (optional)
 I started by measuring the burlap against the pillow form. I cut the material and then used straight pins to mark off where the seams would be.
 When I began this project, I didn't realize that my stencil set did not include numbers - just letters - so I did my best to use forms in the letter stencils to paint numbers. As you can see below, I'm using an "I" as the number 1.  I taped the stencil to the burlap to ensure the stencil stayed in place whiling I was painting.

Note: if you are using stencils, I would suggest utilizing a blow dryer to speed up the drying process. That way you can move on with your next stencil quicker.
After the painting was complete, I used straight pins to tuck the edges of the burlap inside creating a pillow case shape.  I used the hot glue gun to close the seams since burlap has too many wholes for needle and thread.
After I finished gluing the sides together, I felt the pillow needed an extra touch so I decided to add ribbon. I used the hot glue again (these things are AWESOME) to add a strip of ribbon across the top. I also added a bow and button to top it off.

Here is the final product:

FREE DECOR


This project was so easy and so FREE!  Thank goodness for free entertainment.  You can paint anything on your burlap pillow. I decided to chose a number that was meaningful to me because I felt I already had too many words worked into my decor.  Numbers were refreshing - something out of the norm.
If you have questions about making your own burlap pillow, just ask. I would be happy to help.

Check out my project and other DYI ideas on:


A Little Tipsy

DIY under $5
3

Mirror Inspiration

I discovered this beautiful aqua mirror on the House to Your Home blog. I was drawn to the vibrant pop of color. The aqua green seems to be making a statement when topped on the neutral dresser and paired with pastels. 


Most of the decor at my house is based on a neutral or softer palette. I always get a little scared when purchasing something so boldly colored in fear that it will look outrageously out of place in my home. Then if it did look hideous, I would have to waste time taking it back to the store. A loose-loose situation.

In effort to create this look without much financial risk involved, I decided to keep my eyes pealed for potential mirror options I could paint at Goodwill. Here is what I found for ONLY $2.60:


I painted my color options on the back of the mirror to see what they would look like. I think the one on the left is closest to the inspiration picture above.


Still deciding on a color... I'll keep you posted on what I decide.


1

Wreaths Galore

 Awhile ago I blogged about a wreath I created out of scrapbook paper and a styrofoam circle. I love the way it turned out. The best part was that it was so easy to create.  It was very affordable, although I think you can do it even cheaper than I did.  The styrofoam wreath actually ended up costing $6 and I have heard you can buy these at the dollar store for $1.  I didn't have time to shop around when I created mine so I had to go with the more expensive one Michael's had. My other expenses were tied up in scrapbook paper, a stamp pad (to antique the corner of the flower petals), and the stick-on pearl embellishments. Overall, this project was still cheaper than a store bought wreath.

Here is a refresher on this project:


Here is another wreath I created for my bathroom:


My friend, Julia, loved the idea of crafting your own wreath and set out to create her own.  Julia created a ruffle-looking wreath using material and a straw circle form. While her project was easy, it did take some elbow grease.  She said pushing the material into the wreath base was extremely tiring, but worth the work.
Here is how she created it:

1) Cut your material of choice into squares.


2) Use scissors to push the center of the material square into the straw form.


3) Continue until you fill up the front side of the wreath.


4) Keep going. I know it takes a while. (Rest in between if you need to. I hear this really works your muscle.)


5) Top off with the embellishments of your choice.


Props to Julia! Her first wreath turned out to be a beautiful masterpiece!

I also came across this wreath done in burlap. The author of Tatertots and Jello created this for Thanksgiving, but of course you could change the embellishments for any holiday. I absolutely whole-heartedly LOVE it and it may be in my crafting future. Anyone who knows me totally knows this is my style. The polka dots and ruffly flowers speak to me. 


Happy wreath-making!

1

Welcome Home Reed

William Reed recently came home to his new new room. I know he must have been excited about his jungle babies themed room... I know I was! My best friend, Brittany, delivered her first child, Reed, six weeks earlier than expected. Luckily, he is healthy and is getting bigger by the day. Because Reed was so early, his nursery was not completely finished.  Mom and dad both put in extra decor hours lately to put finishing touches on his nursery.  I love the way this brown and taupe nursery turned out.  New dad, Dave, stenciled and painted the walls to fit the theme. I am so impressed with how the painting turned out.

Enjoy the pictures and inspiration!


Welcome home Reed!


0

the NEW white

Style Me Pretty showcased a wedding where the bridesmaids wore white too. I loved it. How elegant!  So is white the new bridesmaid color? I would consider it.


Click here to see this concept come together beautifully!

0

Happy PINK Month

In honor of Valentine's Day, I figured I would share some of my current favorite PINK products with you. Happy shopping!


0

Inside Out Pizza

Here is a recipe I just tried out yesterday. It was abosultely delicous and so easy to make. I am not much of a cook and I was even able to make this dish without flaws. The inside out pizza would be perfect for a Super Bowl party (I can't believe I am even saying that, because I'm not even a big football fan) or any other gathering.

Click here for the recipe from Our Best Bites.


Enjoy!

0

Kendi Everyday & Other New Discoveries

I recently came across the blog, Kendi Everyday. It is similar to the blog, Work Your Closet.  Each blogger documents their outfit choice and fashion inspiration each day.

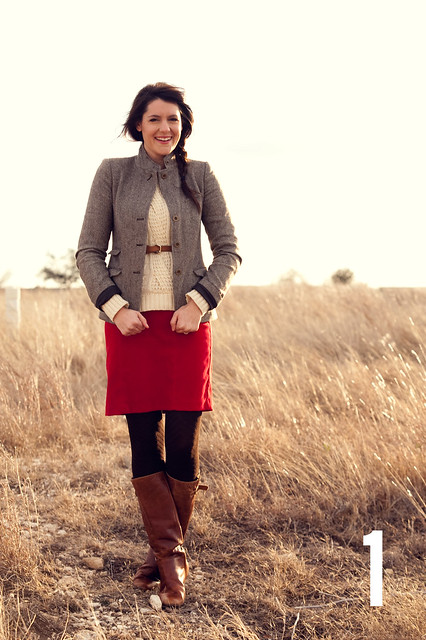
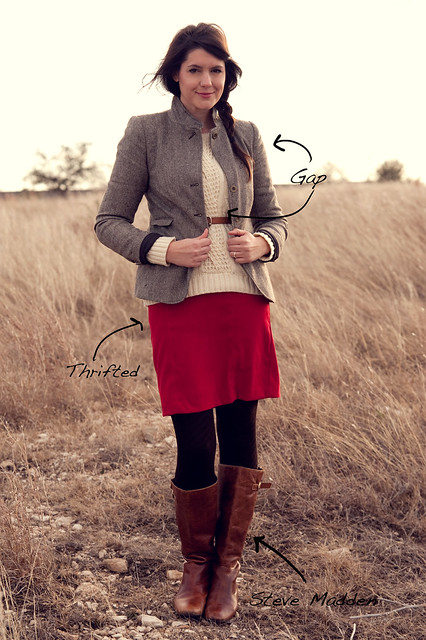
I absolutely love Kendi's style. Here is her latest outfit:


I personally wouldn't have thought to put this bold red skirt with this brown and neutral colored pairing. I would have paired it the easy way - with black.  I love how textured this outfit is.  I am dying to recreate it. Let's take inventory!
  • Similar boots (check)
  • Textured tights (check)
  • Brown belt (check)
  • Cozy Sweater (check)
  • Black Blazer No that will not work. It will probably be too dark.  New Blazer
  • Red wool skirt
I'll keep my eye out for the above items that currently do not reside in my closet. Now is the perfect time for winter clearance!


On another note, I have recently stumbled across some other wonderful blogs. If you read my blog, I know you will also appreciate these:

On tatertots & jello, the author and guest bloggers post about "crafts, decorating, and real life."  There are so many inspiring projects on this blog. It makes me want to try them all!

the home office of Jennifer from tatertots & jello


WhipperBerry is the work of nine friends, the WhipperChics, who pull their ideas for crafts, recipes, and events together in one place.  I could sit for hours and go through all their projects. I know you will love this one!

WhipperChic, Heather's party set available on Etsy


On this blog, a young married couple documents their home renovations. The tag line of the blog is "you're not alone in wanting a kick-ass house on a not-so-kick-ass budget." AMEN sister! This blog is calling my name!


I hope you enjoyed my recommended new reading list. Happy blog reading!


0
Back to Top