My friend, Erika, shared this DIY snowman ornament project.
I loved it and thought it was a quick and cute idea.
Just paint the palm of your hand and fingers with white paint. Grab the body of the ornament from the bottom up with your painted hand. Then use an extra fine pint Sharpie to decorate the snowmen. To enhance clear ornaments, stuff with pom pom balls (as shown above) or other colored filler such as shredded scrapbook paper, confetti, ribbon, etc.
My best friend, Brittany, recently made this cross to give as a gift. It turned out beautifully. In fact, I often see variations of these on Pinterest and Etsy.
So here is a quick and easy tutorial straight from Brittany...
Supplies:
Wooden letter or shape (Brittany says - the more square, the better)
Twine
Hot glue gun
Scrapbook paper
Ribbon
Pearls with adhesive backs (I have found these in the dollar section at Michael's)
Staple Gun
Scissors
Start by hot gluing twine on the back of the shape. Proceed at wrapping each portion of the shape until the entire surface is covered. The end points will get harder and require more glue.
According to Brittany, the spiral scrapbook flowers are also simple to create. Check out the video below for a full flower tutorial.
After you have wrapped the shape in twine and created flowers, it is time to adhere the ribbon. Brittany recommended using a staple gun to attach a ribbon loop to the back for hanging purposes and a glue gun to attach a beautiful bow and your gorgeous flowers. Top off with pearls or rhinestones (or whatever else you would like).
Here is a sample of a letter Brittany also created for a wedding shower gift. Simply stunning!
If you haven't noticed yet - Chalkboards are in. Wow, you see them everywhere. The greatest part about chalkboard projects is that it is so easy to turn any flat surface into a chalkboard. I often see entire chalkboard walls featured in kitchens, craft rooms and play areas. This tutorial, provided by the The Gaines Gang, is so easy and quick. Stop over to check out the step by step directions by clicking here. Also, the best part of about this gift is that it can be re-purposed all year round!
Beautiful meets easy in these simple, but elegant winter trees. Putting on the G.R.I.T.S. provides you with all the information on finding the supplies and piecing these lovely items together. I think they will definitely be on my Christmas to-do list. Check it out here.
Supplies:
Candle Sticks
Styrofoam Cones
Tissue Paper, Yarn, Ribbon or Glitter
Glue
#4) Mod Podge Coasters
So I must admit that I have a thing for beautiful papers (stationary, napkins, plates, etc. - you name it!). Beneath My Heart shows you how to make a coaster set using your favorite papers. In fact these Santa coasters were made from napkins. How wonderful! To see her full tutorial, click here.
Supplies:
Tiles (buy from any home improvement store)
Pretty Paper (napkins, scrapbook paper, computer print outs, wallpaper, etc.)
Mod Podge
Cork Board
Glue
Sponge Brush
Acrylic Sealer
Whew! After sharing all these ideas, I feel the need to get crafting.
Generally, I think it is harder to pick out a homemade gift idea for a guy than it is for a girl. For my favorite boy, I usually resort to clothes considering we both LOVE NEW CLOTHES. For this post, I had to search deep to come up with clever ideas appropriate for the men in your life. Here are my best picks:
Whether your manly, man is a significant other or a family member, this stone collection idea from the James Ann blog is a wonderful, sentimental gift. Just grab a fine point Sharpie and start decorating! Write inspirational quotes or recap of your favorite memories on each rock. I think this would make a great conversational piece displayed on a coffee table.
Supplies:
Stones (Find in your backyard or purchase at a craft store)
I love this idea from the Little Inspirations blog. If you have a Scrabble game laying around, then steal a couple pieces. If not, try thrift stores to score a game at a discounted price. While I include this under the "gifts for guys" section, you could use this concept for anyone.
The blog, 365 Days of Pinterest Creations, shared this idea of "happiness in a towel." Essentially, happiness is a cookbook wrapped in a kitchen towel topped with a spatula (or other cooking utensil). Simple, but thoughtful. If you want to make this a little manlier, try a grilling cookbook. Click here to see a full tutorial on pinning the towel just right to create the gift wrap.
This gift package is actually sold on a wine website, but I think you could recreate this at a fraction of the cost. Just stop by your local grocery store for supplies. To make this gift even better, add a handwritten note designating a date for breaking in the new cooking kit.
Supplies:
Strainer
Pasta
Pasta Sauce
Bread
Bottle of Wine
Ribbon or Raffia
Any other good ideas out there? Email me at SimplySarahStyleBlog@yahoo.com. I would love to feature your fabulous, affordable ideas.
The blog, Being Mrs. Cullins, featured these gorgeous, monogrammed coolers in a giveaway. I love the idea of purchasing an item and personalizing it. If you read Simply Sarah Style, then you know this is something I do often with my Cricut machine and vinyl. You can find coolers for a reasonable price at places like Target and Wal-Mart. Then just use vinyl to personalize them. If you don't have Cricut to cut your own vinyl, many craft stores now offer precut vinyl letters and shapes. I especially like the font choice on these items. It is super girly and sophisticated.
Supplies:
Cooler
Cutting Machine (Cricut)
Vinyl
#2) Framed Burlap Earring Holder
Positively Splendid provided a tutorial on how to create this gorgeous earring holder. This is stunning! There is no reason to hide this in the closet. This would look great on a dresser or evening on a bedroom wall. Click here for the full tutorial.
Aren't these gorgeous! On her blog, Teresa Collins tells how embellish clip boards using rhinestones or broken jewelry. Click here for a full tutorial.
Supplies:
Clip Board
Rhinestones or Broken Jewelry
Glue GUn
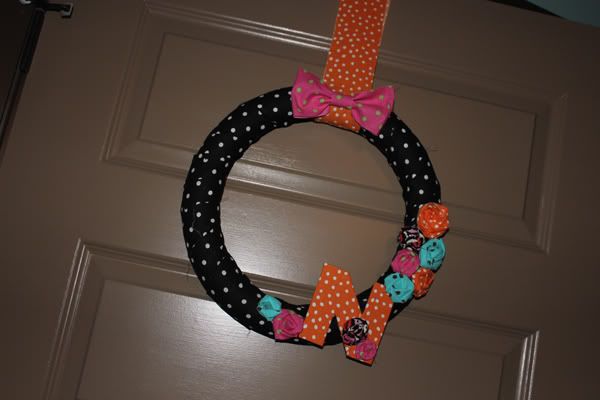
#4) Initial Wreath
My friend Sarah at This Crazy, Blessed Life created this wreath for her sister-in-law and I fell in love. It was on my to-do list all summer. With her tutorial, the possibilities are endless. You can choose a holiday color scheme or something more along the lines of the bold colors below for long-lasting decor.
Supplies:
Wreath Form
Fabric
Cardboard
Glue Gun
Do you have other DIY project ideas perfect for a girly, girl? I would love to hear from you. Please drop a comment below or send me an email at SimplySarahStyleBlog@yahoo.com. Hope to hear from you soon!
Hello, friends and blog readers! I recently received a sweet email from Sarah F. inquiring about suggestions for homemade holiday gifts. Sarah F. writes...
Hi Sarah,
Like you I am very crafty and for this Christmas my budget is very small, and if you have time would like to know what your thoughts are...I am also stressing because I have Christmas and then my boyfriends birthday immediately after...how horrible! You seem like you have unique ideas and I was wondering if you have made any male gifts. Let me know when you have time! Thank you so much,
Sarah F.
Sarah F. brings up a great point. Christmas is right around the corner and many us are beginning to think about what we will gift to our loved ones for the holiday (if we haven't already). In response to Sarah F.'s email, I am going to post a series of homemade DYI gifts. I will break them down into three categories:
Gifts for the girly, girl
Gifts for the manly, man
Gifts with a holiday flair
I will aim at providing you with fabulous DIY gift ideas for under $20 each (most ideas will be significantly under this though). I am so excited about this series! I also can't wait to implement these myself.
Do you have DIY gifts ideas I should include? If so, please share a comment below or send me an email. I would love to feature your idea on Simply Sarah Style.